Punching through a lot of film scanning at home is not only possible with some of the equipment you already have, but can be pretty rewarding too. All film scanning is done with digital sensors, so why not take advantage of the digital sensor in your camera?

One of the things that separates camera “scanning” from a regular scan is the time it takes to capture an image. In a scanner you have to wait for the scan to complete, and that time really adds up, especially as your resolution increases. With a digital camera scan the image capture is instant, so you know your scan is good in seconds not minutes, and you can move on to your next frame relatively quickly.
Tools for the job
To get started you will need the following:
- DSLR, mirrorless, or digital medium format camera
- tether cable
- macro lens or macro extension tubes
- sturdy tripod with a tripod head that can position the lens downwards (or even better, a copy stand)
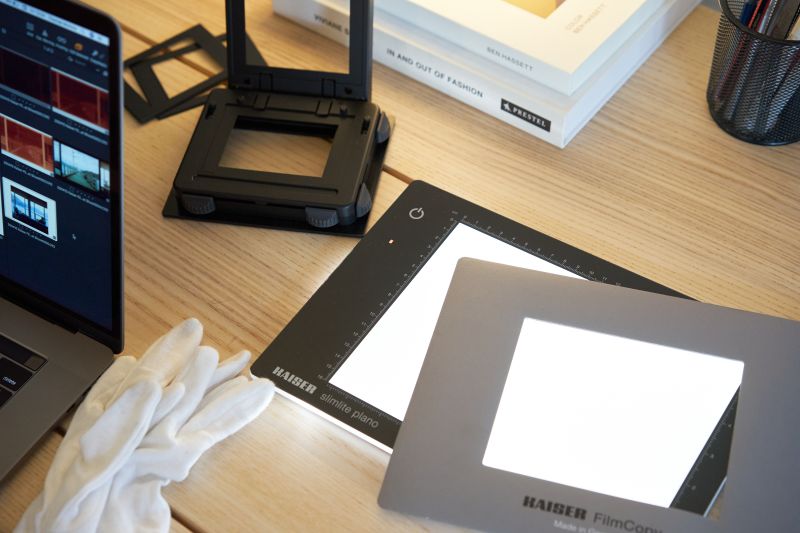
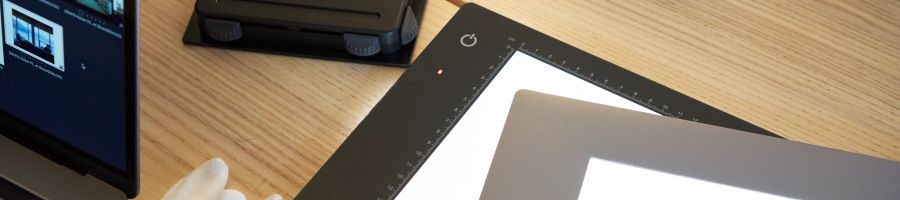
- colour accurate light box
- film carrier to suit your film
- gloves for handling film
- a rocket blower
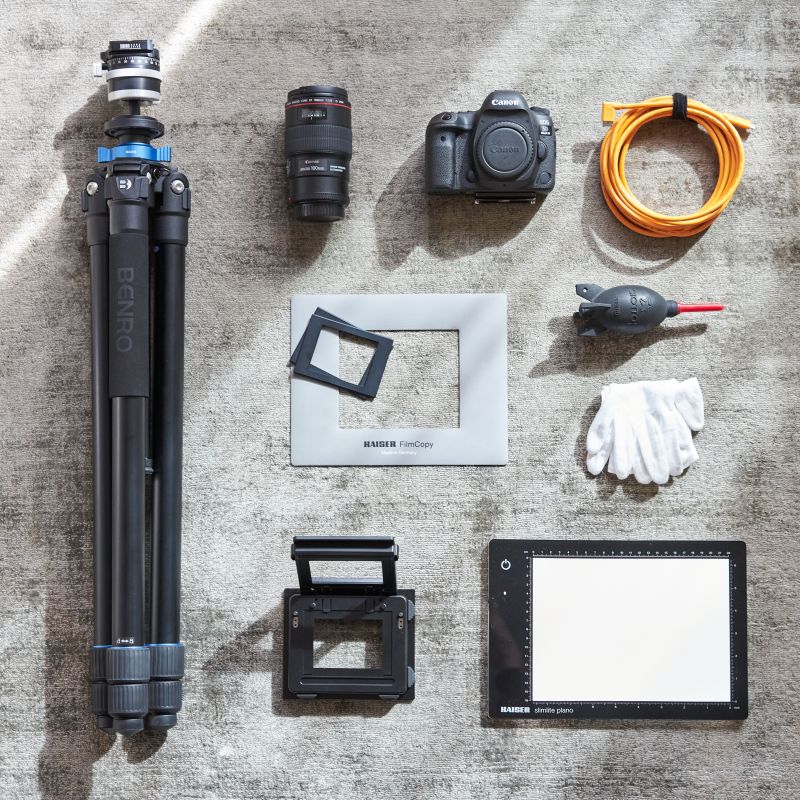

For the sake of simplicity we like the Kaiser FilmCopy Vario Kit. It includes an appropriate light box, film carrier, 35mm slide holder, 35mm strip film mask, and a custom matt to cut stray light from the light box. Different mounts for film sizes up to 6x9 format are available as accessories.
What size scans can you make?
The things that will effect the how big you can scan your film, are:
- the resolution/format of your camera, and
- how much your lens can magnify the film (ie how "macro" it actually is).
So a medium format high resolution back will definitely be an advantage if you plan on scanning for exhibition prints, but for web and general printing any modern camera will work wonders.
If you are scanning 35mm format film, using a full-frame DSLR and macro lens with 1:1 magnification, your digital reproduction will have about the same resolution in megapixels as your digital camera. If you are scanning medium format film on a 35mm DSLR then there will be a little more cropping due to the different ratio of the formats, so your files will be slightly less in megapixels than your camera.
The maths is a bit tedious to get into here, but with the right lens we have made scans of 6x7 and 645 film with the Phase One IQ4 150MP, resulting in files with around 13,000 pixels on the long edge. As you can imagine this supports some pretty hefty prints!
Setup
It is important to be really precise and consistent with your setup. We like to set up a tripod so two of the legs are on a sturdy work surface, with the third leg on the floor. This allows you to work at a comfortable height, and avoids strange gymnastics to position the camera and light box under the tripod!
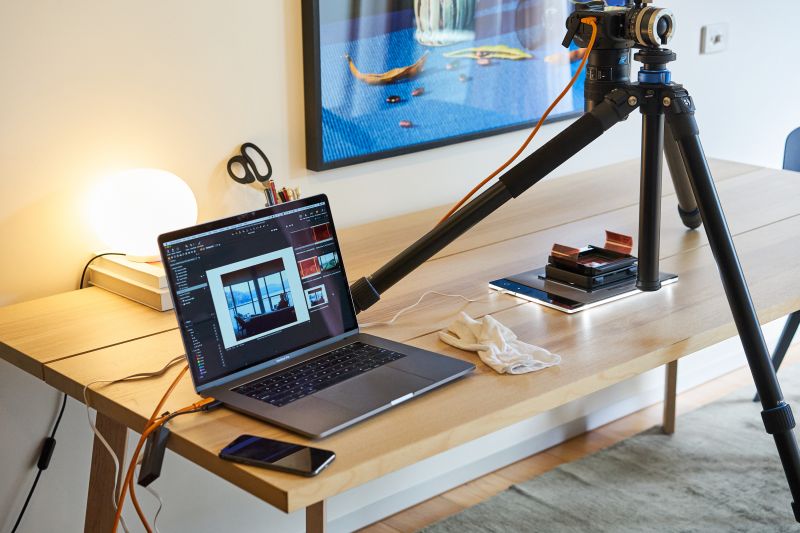
If your camera has a in-built bullseye or level use that, otherwise use an actual spirit level to ensure the camera is level and positioned perfectly flat to the surface of the light box. If you want to get fancy check out the Zig-Align tool. Designed for serious reproduction studios it guarantees perfect positioning.
We think tethering your camera to your computer is non-negotiable, because it is crucial to check focus and exposure as you do the scans.
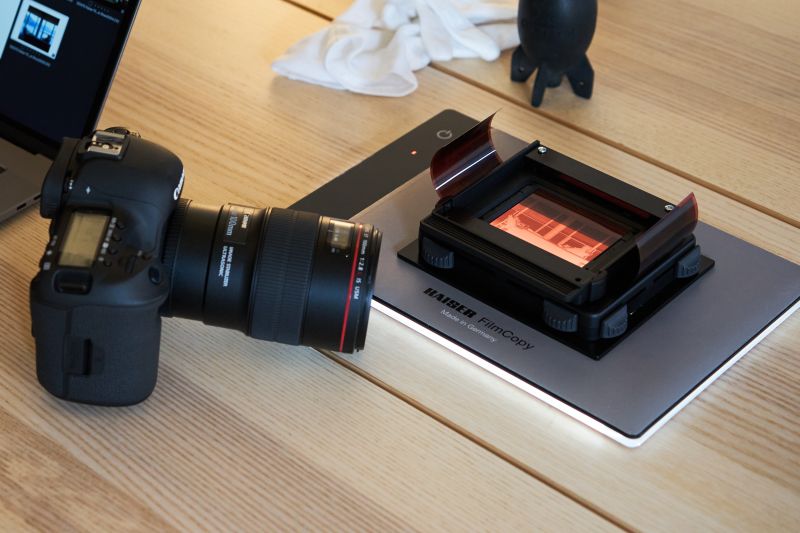
Preparing the film
If using the FilmCopy Vario kit follow the instructions closely to fit the right film mask in the carrier.
Wearing gloves to hold up the film, blow both sides with a rocket blower, and carefully place glossy side down (toward the light box). Placing the emulsion fasting upwards helps reduce reflections, and minimises contact of the emulsion on the film carrier which could result in scratches.
Re-blow the top of the film and lower the film mount with the appropriate sized mask. Do not move the film once the mask is down as this could create scratches. To re-position the film, lift the film carrier/mask, adjust as needed and then set down the top of the carrier again.
Camera settings
The light box is daylight balanced, so set your camera to daylight white balance. Do we really need to mention you should shoot Raw not JPEG?!
A good aperture for most macro lenses is f/8-f/11, so start somewhere there. Set your ISO as low as possible to reduce noise. Then your shutter speed will be whatever is required to get the white of the light box to actually hit pure white.
With the film in place let your camera autofocus do its thing, we find most cameras can focus well on the emulsion of film but some fine tuning is always helpful. After a few test shots to dial in focus and exposure you should be good to go. If using a DSLR with a mirror we recommend using the mirror-lock up feature, and make sure to fire the shot remotely from the tethered computer (or use a remote cable) to avoid any camera shake.

Converting & inverting
There is a little bit of science and a lot of art to making a fantastic scan inversions. For black and white, a simple inversion (using the levels tool), de-saturation, and some brightness and contrast adjustment will get you most of the way to success. Positive transparencies do not require inversion obviously, so give auto white balance and auto-adjustment a try as a starting point or simply go with what looks good!
Inverting colour negative film is a big topic however, and is a little outside the scope of this article. Many people have strong opinions on the best way to invert colour negative scans, so you will have to do some digging to find the method and tools that yields the best result for you. There are some stand-alone inversion applications and Photoshop plug-ins with plenty of fans, while some people prefer a series of layers they use in photoshop to get the job done.
Do you want us to write about colour negative inversion in more detail? Let us know via email or jump on the phone if you want to know more about DSLR film scanning!

Shop the gear mentioned in this article:
Benro TMA47AL Mach3 Aluminium Tripod
ARCA-SWISS Monoball p0 Ball Head with Classic Quick Release
Canon EOS 5DIV DSLR / Canon EF 100mm f/2.8L Macro IS USM Lens
Kaiser 2458 FilmCopy Vario Kit / Kaiser 4436 Format Masks 6x7 for FilmCopy Vario
Giottos Rocket Air Blaster - Large